Thrifty Shed Makeover: Create Cottage Style Charm On A Budget

Our thrifty shed makeover is finally finished! I always saw so much potential in our little shed, and it’s so neat to see my vision come to life!
I’m so excited to be sharing our thrifty shed makeover with you guys! Back in April I shared about our cottage garden shed plans, and I am still so shocked at the difference that just a few small changes made!


This post contains sponsored links. For my full disclosure, click here.
Thrifty Shed Makeover
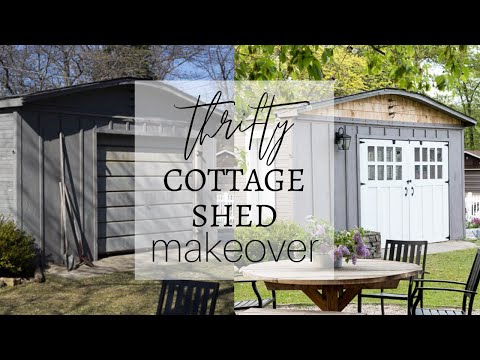
So why am I calling this a thrifty shed makeover? I’m so glad you asked! Let’s go back to what our old shed looked like before we started this makeover…

The very first thing I wanted to do to this shed was change out the garage door. Not only did it have zero charm, but it was also extremely difficult to open. After some research I really had my heart set on carriage doors, but goodness they were pricey.
I didn’t want to spend thousands of dollars to purchase new shed doors, so I decided to check out Facebook Marketplace. I have some tips about buying on Facebook Marketplace here if you’re interested!
I almost couldn’t believe it, but when I typed in “carriage doors” I got a match right away. Two beautiful, 100 year old timeless carriage doors with a massive window to match for $150. And they were only an hour away!

They were a little taller and less wide then our shed door opening, but my husband thought he could make them work. We went and got both doors and the window last fall, and this spring we finally got them installed. In order to make them wide enough to fill our shed opening, my husband simply added wood to the outsides of each door.
We both went to work scraping and sanding these doors down, then I gave them a fresh coat of white paint. You can’t tell very well in these photos, but the doors have so much character and wear on them which I love.

After the doors were installed, we had a long widow that we did’t know what to do with. Well, my husband decided to cut the window in half and install each half on either sides of the shed! It instantly added so much charm and now the inside of the shed gets SO much more light!
Win win!


We also happened to have a long, skinny door that a friend gave to me and it was just sitting in my basement. I asked my husband if he could add it to the side of the shed for another entrance and that’s exactly what he did! There happened to be a piece of plywood nailed to the side of the shed and we always wondered why it was there. After tearing it off it looked as if a window had been there originally, so my husband just cut the opening out even larger and added our little door. I love it there!

We created a little walkway up to the door with stone pavers that my sister gave to me, and all the trim that you see around the door and windows is all made up of old fence boards that Mike’s parents gave to us. We also used the fence boards on the inside of the shed to create shiplap walls and add more stability.

I gave the entire shed a fresh coat of paint, we just took some paint that was chipping off of our house and color matched it at our local hardware. Personally, I don’t think it’s an exact match. The color reads more purple than our house color which definitely bothers me, but for now it’s fine.
The last thing we chose to do was add cedar shake to the front of the shed right below the roofline. It was tricky with the curve of the roof, but my husband always finds a way. The shake was only $15 per bundle and we only used one bundle! We might use the extra bundle to do something fun on the play house.

I left the cedar shake raw for now and decided not to stain it. I think it’s such a pretty contrast against the gray shed! A charming weather vane was the cherry on top!

Lastly, we added a wall lantern near the carriage doors! This is the exact same lantern we used for the front of our porch when we completed our porch makeover. It’s the Edgehill 2-Light Outdoor Wall Sconce from Signature Hardware, and it’s absolutely stunning! It adds that perfect finishing touch and goes so nicely with the cottage style of our garden shed.

As you can see, we chose to turn use our DIY raised beds into a beautiful little flower garden. All of the wood and stone was given to us for free, and I loved the weathering on the boards of the raised beds.


Initially the plan was to have a vegetable garden here, but unfortunately the beds are made of treated lumber. After a lot of research we decided to just use the area for flowers and plant vegetables elsewhere.
I have so many plans for this beautiful little garden, maybe shutters on the side of the shed and even a little window box for flowers. I would love to find some white roses and even have an arbor somewhere as well. We planted a small Jack Callery Pear near the garden edge which is strictly ornamental, and it will only grow to be about 10-15 feet tall. I can just picture a small bench under the tree where I can sit and enjoy my flower garden in the mornings!

We had some extra flowers after planting my widow boxes in the front of the house, so my husband and I built a stone planter to put next to the shed. You guys know my love for stone!! We had some leftover from when we added it to the porch (it was free – watch my YouTube video above to see how) and I knew it would make for the prettiest planter! It adds a beautiful, rustic touch. 🙂

So much of our backyard is DIY. The garden, the shed, the playhouse, the pea gravel patio, the table….so many projects but so worth it in the end. I love sitting out here in the evenings and listening to the kids play. We planted lilacs all along the back of our fence, both purple and white. Years from now I hope to have a really private space that smells beautiful every spring!


I am absolutely in love with how this whole project came together! Isn’t it amazing the difference you can make with just a few small changes? It takes a lot of work and some creativity, but there is always a way to achieve beautiful, even on a budget.


So, what do you guys think of our thrifty cottage shed makeover? Let me know in the comments below! And be sure to keep up with Pine and Prospect Home over on Instagram and Pinterest to stay updated on all of our budget-friendly, new home DIY projects! I’m sharing a lot of our recent backyard updates on Instagram Stories and never want you to miss out!

PIN IT FOR LATER


Wow. You guys did an amazing job. I love everything about it and your backyard!
Aww thank you so much Dianne!! 🙂
Wow, the transformation you made is AMAZING! It looks so beautiful! It’s hard to believe that is the same shed. Your whole yard is really gorgeous!
Thank you SO much Tara!! That means a lot!! 🙂
So sweet and VERY creative use of materials! Nice job!
Thank you Chris!! 🙂
This turned out beautifully! The lilacs really set it off! 💜
Aww thank you Donna!! 🙂
It looks great! I enjoyed these pictures and the video. What a transformation! Your creativity amazes me! You and your husband make such a great team! Thank you for sharing and giving your source information. Your yard is tranquil and lovely!
Sherry thank you so very much, that is so kind!! 🙂
Wonderful transformation. SO many great pictures. Pinning away. The setting is beautiful.
Have a great day. XO- MaryJo
Yay!! Mary that means the world!! 🙂 Thank you so so much!!! 🙂
Love the way it all came together, Andrea! Thinking outside the box and using what you have makes for a unique and special space to enjoy with family and friends. Great job!
Thank you so much Genevieve!! That is so kind of you to say!! 🙂
It looks beautiful! You guys did an amazing job. Is the table a DIY project?
Thank you Jennifer! Yes, the table is DIY 🙂
Your garden with all the current lilac blooms is soooo wonderful and cozy!!!!
And the shed makeover was totally worth it!!! Fortuantely you could persuade your hubby to rework the shed 😉 Gro0es Kompliment. Mike hat wirklich gute Arbeit geleistet! (Big compliment. Mike had done a really good job!)
Liebe Grüße aus Hannover
Thank you Tanja!! I’m so glad we rescued it and gave it new life! 🙂
Just a magical transformation and lovingly done. But what comes to mind as I follow this makeover is, how do you manage 3 little guys from getting into the paint, etc., while doing these projects? Especially the ones in the house!
Haha yes…my husband and I have to take turns! There is no way we can both be working on projects at the same time. Somehow we always find a way! Thank you so much for the kind words! 🙂
Wow! You did a great job. I also have a small cottage in the backyard. I keep my construction tools there. It is very old and has a very unattractive appearance. Now I know what to do with it. I was inspired by your idea. By the way, tell me where you can buy such garden chairs? I think they will fit perfectly into my exterior. Thanks again for inspiring me.
Thank you so much, so happy to hear that this can help you! Which chairs are you referring to? The black ones? If so, those can be purchased at most outdoor places, we got ours at a local hardware store. I hope this helps!